|
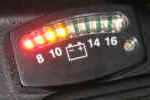 Dash mounted LED Voltmeter displays 8-16VDC in 1 volt increments.
Has a warning LED for when voltage is less than 10VDC or higher than 16VDC.
Black, Adhesive Mounted, approximate dimensions are 1.75"W x 1"H x
.5" thick. Easily installed with minimal fuss, just crimp two terminals to
the wires and attach to the dash where the lighting wires connect. FI bikes
will die with little warning when the voltage drops if the charging system has
died, better to have an indication in advance. Dash mounted LED Voltmeter displays 8-16VDC in 1 volt increments.
Has a warning LED for when voltage is less than 10VDC or higher than 16VDC.
Black, Adhesive Mounted, approximate dimensions are 1.75"W x 1"H x
.5" thick. Easily installed with minimal fuss, just crimp two terminals to
the wires and attach to the dash where the lighting wires connect. FI bikes
will die with little warning when the voltage drops if the charging system has
died, better to have an indication in advance.
Available
through American Sportbike.
Have you worked on your bike lately? Anything at all? Retrace your steps...
you have have pulled something loose. Results may not be immediate either...
see below.
I wrote a message on the forum a few days ago about my bike not starting and
that I was frustrated...needed to vent. Come to find out the problem was ME! I
pulled some wires while installing the tach or they moved possibly when
turning. The wires fed power to my starter. I guess the bike is more reliable
then the owner.
Down under the battery where the speedo-sensor wire and an oil line run up
over the rear corner of the inside of the primary/clutch housing, that inside
upper edge gets enough vibration and movement to almost wear thru the oil line
and any adjacent wires. There are also some very tight wire bundles routed
around/along the frame under the gas tank and heading up to the front of the
bike. Also, check very closely around the electronic controller as there are
also a bunch of wild tight bends around there.
 Riding along, bike starts cutting
out... engine light going off & on. Bike finally died altogether. With
ignition on Run, engine light no longer coming on, fuel pump not coming on, no
odometer display, no oil pressure light. Plenty of power... horn blasts. With
ignition on Park, odometer display flashes. Scanalizer not getting any input.
Solution! Broken ground wire, back of gas tank next to the 30A circuit breaker.
See photo. Riding along, bike starts cutting
out... engine light going off & on. Bike finally died altogether. With
ignition on Run, engine light no longer coming on, fuel pump not coming on, no
odometer display, no oil pressure light. Plenty of power... horn blasts. With
ignition on Park, odometer display flashes. Scanalizer not getting any input.
Solution! Broken ground wire, back of gas tank next to the 30A circuit breaker.
See photo.
| Loose Connection at Circuit Breaker |
While the bike is running, ie cruising down the road, the odometer will
flicker or turn off, the speedo will drop to zero and the engine will stumble
then die. The check engine light does not come on. I pull in the clutch, coast
to a stop, turn the ignition off then back on. The ECM does its diagnostic
check, the check engine light goes out, and if the odometer is lit up the motor
will start and I'm on my way again. If the odometer isn't lit up the starter
motor just clatters (the headlight is also dim), that usually gets the odometer
back on, then the starter will fire the motor. Solution... Found it at the 30A
circuit breaker under the seat/tank (see above photo).The black wire from the
starter and the red wires from the voltage regulator and key switch/fuse box
were slightly loose. Man, that circuit breaker post gets hot when there is a
little resistance there!
Bike won't start... no power to fuel pump. It turns out that the wires going
into the bottom of the fuse box were loose. Gave it a shake and the fuel pump
kicked in. Engine started right up.
The dash won't light up at all when I turn the ignition key to any of the
positions, and not even the horn will sound. The battery still has a normal
charge. The ignition fuse is not blown. I checked the ground cable and it is
secured. So I figured it was a broken wire somewhere... after combing thru the
wiring harness, battery ground wires, fuse box, ecm, I looked up more
thoroughly under the battery tray and saw the ignition wire that comes up from
the starter blown clean through and self-welded to the underside of the battery
tray. I had initially missed it because it still appeared like both ends were
together & felt secure when tugging on it, but this was only because it
fused itself securely to the metal tray and even burned a divit into it! The
wire had been routed very close to the tray and had apparently worn through
after 6700 miles of vibrations and shorted out. My solution was simply to peel
the wire off the tray, strip down, re-join with a butt-connecter and re-route
out off to the side out of the reach of tray, frame, etc. I plan to go back and
solder the wires when I have time, but the possible slight possible voltage (12
volts still here) drop hasn't seemed to affect the ECM. After that she fired
right up and is running strong.
Beware of the routing of the TPS wire. Problem with the ignition cutting out
(fun ride to the shop) and mechanic discovered that the throttle cable was
rubbing on the tps wire.
About 1/3 of the time with the tranny in neutral, the neutral light won't
come on. Have to pull in the clutch for the fuel-pump to work. Starting the
bike with the clutch in, the neutral light will often come on, and the clutch
can be let out. Possible solution... try cleaning the Neutral Switch connector
where it attaches to the tranny fitting. It's probably intermittently making
contact which would explain why the light comes on after the engine starts.
The speedo died and the trip odometer still registers but does not change.
It is not a fuse … it turned out to be the pick-up unit that is mounted on
top of the transmission box. As you are sitting on the bike it is
right-of-center. It has a large black wire, 1/2" x 1/2" black plastic
piece and one allen bolt holding it in place just back of the starter.
Make sure your plug wires are not chaffed at all. Also make sure that they
are routed away from the wiring harness of the bike... the wires can cause
stray voltage in the engine and destroy your speedo sensor. As a matter of
fact, Buell recommends replacing your plug wires with your speedo sensor just
to make sure.
Get the updated sensor p/n 74431-01Y (the old number was 74402-95).
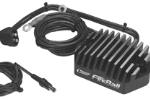
Our friends across the pond at Trojan Horse have come up with a nifty little
product. Speedometer sensor failures are fairly common with these bikes and at
about $55 a pop not including installation it’s a pricey nuisance. If
you’re lucky a speedo failure only results in a dead speedometer but as
has happened to me, it can also blow your ignition systems thereby killing your
bike. Trojan Horse has made a fail-safe device that sells for about $36 ,
installs in about 5 minutes and is small enough to mount on the strap holding
your battery. OK, so what does it do? Something in the bikes electrical system
causes a spike that in turn shorts out the speedo sensor. Generally you’ll
get a warning when your sensor is about to go bad because the speedometer will
start acting erratic. At the first sign of this pull over and disconnect the
speedo sensor before you blow an ignition fuse. The Trojan Horse device is
spliced into the wire delivering power to the speedo sensor thereby acting as a
surge protector. The device will not fix a failing/failed sensor but it should
protect a good one from going bad. The Trojan Horse unit is weatherproof and it
has a power LED to let you know the device is working. The only importer
I’m aware of for this device is Dave Stueve at 1-800-342-7539 Ext 14 or
dave@iowaharley.com.
Buell has released a
Speedo Sensor Rewire Kit to reroute the power feed to a regulated supply.
(Part# Y0199.K)
Refer
to a BadWeb thread for further information on "homebrew fixes"...
| Blowing 20amp Ignition Fuses |
Problem with speedo sensor... it shorted out and would blow the 20 Amp
Ignition Fuse when you would turn the key switch on.... did this 4 times. As
soon as you would turn the switch on it would blow the fuse... had lights but
no start circuit or power to the ECM. When you power up this puts 12volts to
the speed sensor (and a lot of other things) and it was shorted to ground, thus
taking out the fuse.
Blowing 20A ignition fuses at various and frequent times. Turned out to be a
bad Ignition Relay.
Would blow the ignition fuse with a passenger on it. It turns out the wiring
harness, as it comes out of the ECM and down the left frame tube, was routed
under the rear Heim joint, which would pinch the bundle on top of the swing arm
mount with the additional weight of a passenger. This wore the insulation off
of one wire which would only short out with any additional weight. To fix the
problem the dealer rerouted the wiring bundle on top of the Heim joint. The
rear brake line had to be disconnected to do this, and rerouted under the
wiring. I also pulled the bundle up higher, at the bend, and zip-tied it to the
battery tray.
Blowing 20A ignition fuses... found the wire loom under the steering head
rubbing on the mounting boss in front of steering neck. It is nice and square
(sharp) and has cut some wires open, leaving them exposed so when I turn they
must go to ground.
Noticed several chafing cuts on the rear cylinder wire. One cut exposed the
inner insulation.
| APPLICATION |
7mm
(Black only) |
8mm
(Blue only) |
KV85 8.5mm
(Red only) |
| Carbureted engines, 1995-2000
(except Blast) |
2743 |
2043 |
2543 |
| Fuel injected engines, 1999-2000.
|
2748 |
2048 |
2548 |
| NOTE: This set is supplied with a straight boot
at the spark plug which improves on the factory 90º configuration;
particularly if you have had the modifications of the Buell factory recall 0819
done to your engine (which adds a new fuel filter mounting bracket that
interferes with the rear spark plug wire). |
PIAA sells a Super White 80W/80W bulb Part # PA15080 (PA15680 for a pair)
which has the equivalent lighting of 100+ watts. You can get these from ASB,
some bike dealers or any decent speed shop for $35-$40. Expect trouble if you
really use a bulb with 130+ watts of draw...meltdown time.
Our stock alternators should handle extra lights and heated vests as it is the
same capacity alternator as those used on older HD touring bikes, which were
often outfitted with the same type accessories running off stock alternator.
Taillight... find a parts house handling Wagner bulbs. Use #98, it is a
heavy duty replacement for the #1157 style bulb. It has been used in the
trucking industry for sometime. Other manufacturers make the #98, Wagner is
probably one of the better ones available.
Check engine light would come on intermittantly on my X-1. Always one of
three codes, front or rear injector and IAT sensor. Also occasional fart or
pop, seemingly from intake area, setting no code or C.E. lamp. A careful check
of injectors, sensors and wiring revealed nothing and since the bike ran fine I
dismissed the C.E. light as an annoyance. Then my ignition switch failed, as in
will not turn to ignition position or supply ignition power. So I replaced it
and that seems to have solved my C.E. light problem as well.
Apparently there was an intermittant low power supply to the ignition system
which resulted in the check engine light problem.
Here is a tip someone may need in the future. When my ignition switch went bad,
there wasen't a Buell switch this side of the Mississippi river, and to order
one could take up to two weeks. Harley part #71441-94 is a ringer for the
original Buell switch, all you must do is splice your Buells ignition switch
harness connector to the Harley switch, there are even butt connectors supplied
with the switch, and the wires are color coded the same.
|
 After installing braided oil lines, turned key, bike goes
"click". Solution... inadvertantly dislodged the starter solenoid
plug during oil line installation. After installing braided oil lines, turned key, bike goes
"click". Solution... inadvertantly dislodged the starter solenoid
plug during oil line installation.
The wiring from the fuel pump had been pinched between the tank and the
rocker box. The wiring was bare! The hot wire, the ground wire and the brain
wire was shinier than a polished gold nugget. Also found that the fuel hose was
loose. These two things coupled together could have spelled disaster. It might
be a good idea to check to see if your wiring is not sitting between your tank
and your rocker box!!!!
Most starter problems are actually battery problems. First check the
tightness of your battery cables then check the connections at the starter. Be
careful not to arc the battery by touching a wrench between the positive and a
grounded part of the engine or frame. Try the starter again. If the problem
still exists, test the battery with a volt meter, anything under 12 volts is
definitely bad, change the battery. If the voltage is over 12 volts a load test
should be performed on the battery because it may still be bad when under a
load. You can buy a load tester at Sears or an auto parts store for about $20.
Sportster starters are pretty reliable, Buell batteries are not so.
You'll save a lot of money by purchasing the trickle charger that MCN has
once again rated as the "Best Buy". It is the charger Tat offers at
ASB. I've been using it this winter and have had no problems at all. Everyone
should have one for each bike they own that has to sit un-ridden for a few
weeks at a time.
Hawker
545… the nicest thing about this battery is the three-year full
replacement warranty. The battery also has 545 CCA(cold cranking amps) and is a
fully sealed special type of gel battery that resists vibration damage.
Odyssey
batteries
Red
Top batteries
The bike started to bog down like it does when it's time to switch to
reserve. When I looked down I had no lights. Everything was off. I coasted to a
stop and looked for anything obvious. Couldn't see anything. When I turned the
key back on the power came back, but low. The lights and speedo were real dim.
Then it seemed to come back to a "normal" level. When I tried to
start it there was a click, but nothing happened and the power went dead again.
This was repeated several times with the same results. Solution... Got it to
the shop & they couldn't find anything at first. It started & ran
perfectly. They kept it a couple of days & finally the battery shorted out.
It was an intermittent short. New battery.
If the battery is low, the ECM goes into fits, and if you have a wiring
harness short, the ECM goes haywire also. The 2001 X-1's have a new wiring
harness.
At 4500rpm's the Tach started fluttering up and down... it only lasted a
second or two but long enough to catch my eye. Checked all connections, etc.
About 2 days later, battery went dead - while I was riding the bike! After
sitting in the parking lot for about 90 minutes, started OK, but then began
running rough as the Tach (and Speedo) started convulsing. Also noticed
headlight dimming. Managed to get home by keeping the bike in 3rd and revs up
above 4 grand. Replaced the battery, hasn't been a problem since. I think
there's a threshold voltage at which the Tach or Speedo will/will not work, and
if you fall below that, your ECM starts to go nuts as well.
You should have your multi-meter in AC mode with Voltage/Ohm lead connected
to one stator output wire and Multi-meter common lead connected to other stator
output. You should have between 32-58 volts @ 2000 rpm and above. If you fail
this test (AC out put too low) your stator is bad, or your rotor has lost
magnets and/or left the shaft to pursue other interests. If you pass this test,
the fault lies up stream in the wiring/regulatator/bat dept.
On a recent ride the engine light came on, then minutes later the
speedometer died, followed a minute later by the tachometer dying. Shut the
bike down... it would not re-start and the electrical was completely dead. Once
it cooled all the electrical components came back, but the engine would not
start. The cause of the failure was a defective voltage regulator. The bike was
less that a year old and has a littled over 4000 miles on it.
If you're eating a lot of taillight bulbs, I'd suggest a quick check of
voltage with the engine running at >3000rpm. One known failure mode of
Harley's voltage regulators is to go over-voltage (running >15v rather than
14.4). The bulbs seem to be the most sensitive to this and usually fail first.
Still, over time, an overvoltage will cook your battery, burn out those halogen
headlight bulbs, and most expensive, possibly fry the ignition or FI
controller.
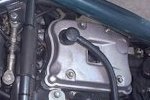
| Make sure your Voltage Reg is Grounded |
 If you get either an upgrade shock installation or
an exhaust bracket retrofit kit installation, make sure that your bike can
charge its battery when you pick it up. Both jobs involve removing and
installing the voltage regulator to a new mount where the VR must be properly
grounded, otherwise charging system failures afterwards are likely. If you get either an upgrade shock installation or
an exhaust bracket retrofit kit installation, make sure that your bike can
charge its battery when you pick it up. Both jobs involve removing and
installing the voltage regulator to a new mount where the VR must be properly
grounded, otherwise charging system failures afterwards are likely.
 Chris, the BUELL mechanic at Ft. Washington HD, installed this
SECOND GROUNDING WIRE between the back of the voltage regulator and the engine
case. It goes between the back of the voltage regulator and the new mounting
plate and ends at the case there on the right with the star washer. The first
ground wire is part of the group of wires that exits the votage regulator. It
is very important to remove the paint from the muffler mount and the case where
they connect to provide a good electrical contact. Also make sure your mechanic
checks for continuity through the ground to make sure it is working. Chris, the BUELL mechanic at Ft. Washington HD, installed this
SECOND GROUNDING WIRE between the back of the voltage regulator and the engine
case. It goes between the back of the voltage regulator and the new mounting
plate and ends at the case there on the right with the star washer. The first
ground wire is part of the group of wires that exits the votage regulator. It
is very important to remove the paint from the muffler mount and the case where
they connect to provide a good electrical contact. Also make sure your mechanic
checks for continuity through the ground to make sure it is working.
 Unique "Series Design" regulator provides proven HP
increase by eliminating alternator "drag"! At high RPM or when
battery is fully charged, "disconnects" alternator operation,
applying formerly wasted HP to rear wheel! Plug-in 110v AC outlet
"Smart" charger keeps battery "Topped Off"! Prevents
damaging overcharges and dangerous "boil-over"! Extends battery life!
Compact, convenient, "take it anywhere" size! Unique "Series Design" regulator provides proven HP
increase by eliminating alternator "drag"! At high RPM or when
battery is fully charged, "disconnects" alternator operation,
applying formerly wasted HP to rear wheel! Plug-in 110v AC outlet
"Smart" charger keeps battery "Topped Off"! Prevents
damaging overcharges and dangerous "boil-over"! Extends battery life!
Compact, convenient, "take it anywhere" size!
When you disconnect your electrical connectors clean the contacts with the
electrical contact cleaner. I have had problems in the past with crud building
up on the connectors. After cleaning the connectors, if you can find any
(aircraft parts store) pack the connector with electrical potting compound.
This will prevent further crud problems.
If the ignition fuse blew without warning while you were riding disconnect
the speed sensor and try the spare fuse. If the fuse blows again and you don't
see an obvious short in the wiring harness better have someone come get your
bike. The first thing you need to do to find a short is identify where you
should be looking. This can be a quick process with a few basic tools and a
simple methodical process. Some have suggested unplugging everything and then
plugging them back in one by to see what blows the fuse. Unless you get lucky
THIS DOES NOT WORK! This requires removing the gas tank, bodywork, and fairing
much of which may not be necessary. Because many of the circuits are
interrelated this process could easily lead you in the wrong direction not to
mention the many combinations you'd have to try. You could get lucky which is
probably why those who've stumbled on the short doing this method recommend it.
It's much easier, and quicker, to focus on first identifying where the short
will be and then finding it. To find a short you'll need a wiring diagram
(service manual), plenty of extra fuses (at least 5) and an ohmmeter. Once you
think you've found the short verify it by consulting your wiring diagram.
STEP 1, (ignition fuse) - If the short didn't melt your wiring harness the
short is on the load side of the ignition fuse. If the wiring harness melted
then the short is probably between the fuse and the ignition key switch. The
load side of a fuse is what you might consider the negative side of the fuse,
the side that goes to the relay unit, not the side that comes from the ignition
key. First test for continuity on the load side of the fuse, it shouldn't but
it will have continuity. Next remove the ignition relay unit and repeat the
test. If there is continuity then the short is between the load side of the
fuse and the relay unit. If there isn't continuity then go to step 2.
STEP 2 (Relay unit) - Switch the two relay units (they're identical), put in
a good 20 amp fuse and turn the ignition key to see if the fuse blows. If the
fuse dose not blow then you have a fault relay unit and you'll probably blow
accessory fuse. If the fuse blows then your short is on the load side of the
relay unit, go to step 3. Remember the relay unit completes the circuit that
provides electricity to the ignition and related parts so if a fuse blows when
doing this, the short is past the relay unit.
STEP 3 (Load side relay unit test) - Remove the ignition relay unit and test
each of the four wires on the load side for continuity. Your wiring diagram
will identify which color wire you should be testing. Once you've identified
the wire(s) that have continuity with ground you now know where to look for the
short. Using your wiring diagram identify which devices could be effected and
unplug them. Put in a good 20 amp fuse and turn on the ignition. If the fuse
doesn't blow then one of the devices you unplugged is at fault. Plug each one
in and out to see what blows the fuse and if this doesn't identify the culprit
plug them all in one at a time. If the fuse blew when you had everything
unplugged you have two wires rubbing together, go to step 4.
STEP 4 (Testing the wiring harness) - Since you know where to look for the
short this is the part where you start jiggling the wiring harness to see where
the ohmmeter reacts. If you get a reaction then consult your wiring diagram to
see which wires should NOT be grounded and test them one at a time. Remember to
have the related components (Speed sensor, oil pressure gage..) unplugged. At
this point you've narrowed it down to about six wires so this shouldn't take
that long. At least you'll know the short is somewhere between point A and
point B.
There are a couple of very remote possibilities not covered here but if this
doesn't identify what's blowing your ignition fuse it's time to consult an
expert. At this point you'd probably do better talking to an auto mechanic
that's ASE certified for ignition systems because they will probably be better
equipped to help you then the average H-D mechanic. The issue is vehicle
electronics, not motorcycles. This is what I did and by just looking at the
wiring diagram he was able to identify where the short would most likely be and
how to test for it. Oddly enough what he told me to do identified the problem
as being the speed sensor, something I did not detect when I tried the unplug
everything recommendation (interrelated circuits?). He also pointed out that
bridging the fuse to see where the wiring harness starts to would only melt
your wiring harness if the short was caused by a component like a speed sensor.
Either way you need a new harness because at the very least you've weakened it
by over heating it. Anyway, following these steps I was able to identify the
problem in about 15 minutes.
|


)
)
 The
Buell kit come complete with all gaskets and mounting harware. The front
cylinder head mount, and top breather kit, along with the exhaust are sold
seperately. Pistons require fly-cuts for 4 valve pockets and the pushrods and
covers are sold seperatley.
The
Buell kit come complete with all gaskets and mounting harware. The front
cylinder head mount, and top breather kit, along with the exhaust are sold
seperately. Pistons require fly-cuts for 4 valve pockets and the pushrods and
covers are sold seperatley.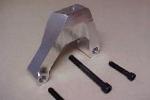 Broken front mount? This mount from Max "T" Engines is
machine billet and comes with case harded bolts Stronger than stock.
Broken front mount? This mount from Max "T" Engines is
machine billet and comes with case harded bolts Stronger than stock.
 This device fits Evo Big Twin and Sportster. It simply threads into
the bottom of the cylinder oil return and fits tight into the cases giving you
a true oil passage that in no way can leak like the Evos are notorious for. It
simply provides a direct tract from the cylinder return oil drains to the
crankcase not allowing any chance of the oil to escape by seeping over and
under the base gaskets during warmups.
This device fits Evo Big Twin and Sportster. It simply threads into
the bottom of the cylinder oil return and fits tight into the cases giving you
a true oil passage that in no way can leak like the Evos are notorious for. It
simply provides a direct tract from the cylinder return oil drains to the
crankcase not allowing any chance of the oil to escape by seeping over and
under the base gaskets during warmups. 
 The benefit of doing this is greatly improving the engine’s
breathing ability and therefore reducing the amount of oil puking out of the
heads, a subject near and dear to every Sportster/Buell owner. A side benefit
is the “cool factor” of having new XB parts on your old tube frame
Buell.
The benefit of doing this is greatly improving the engine’s
breathing ability and therefore reducing the amount of oil puking out of the
heads, a subject near and dear to every Sportster/Buell owner. A side benefit
is the “cool factor” of having new XB parts on your old tube frame
Buell.  Fan Kit 91367-99Y. The installation instructions in PDF format is
 Time
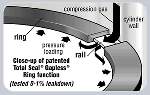
for new rings? Consider these... recommended by Hoban Brothers Racing 2002
National Thunderbike Champions...
Time
for new rings? Consider these... recommended by Hoban Brothers Racing 2002
National Thunderbike Champions...)
)
)
 Positives: Turn-Key Installation... no honing or other prep
required; Power/Throttle Response... less distortion/friction; Customer
Service... George exchanged sets for me with minimal charge; Weight/High
Tech... 2-3 lbs less than Stock, 12 lbs less than Axtell; Fast Break-In/Ring
Seating... generally less than 100 miles; Ruggedness... they have held up very
well, and they seal well.
Positives: Turn-Key Installation... no honing or other prep
required; Power/Throttle Response... less distortion/friction; Customer
Service... George exchanged sets for me with minimal charge; Weight/High
Tech... 2-3 lbs less than Stock, 12 lbs less than Axtell; Fast Break-In/Ring
Seating... generally less than 100 miles; Ruggedness... they have held up very
well, and they seal well.)
)
 Six-Speed Overdrive, named the XL6 Conversion Kit, features full
width gears for uncompromised torque capacity and strength. Baker also
developed a new shift drum and detent plate with improved geometries for
smoother and more precise shifting.
Six-Speed Overdrive, named the XL6 Conversion Kit, features full
width gears for uncompromised torque capacity and strength. Baker also
developed a new shift drum and detent plate with improved geometries for
smoother and more precise shifting.)
)
)
)
)
)
)
 I
have over 15,000 miles on my
I
have over 15,000 miles on my
)
)
 Here's a funky accessory from
)
)

)
)
)
)
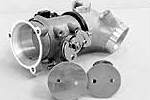 23% increase in butterfly area 21 CFM increase in airflow. Throttle
Body Upgrade: • Bore to 50mm • Install throttle linkage gusset •
Install new butterfly
23% increase in butterfly area 21 CFM increase in airflow. Throttle
Body Upgrade: • Bore to 50mm • Install throttle linkage gusset •
Install new butterfly  You will need the Hi-Perf O2 sensor if you want to control the mix
below 3400 rpm otherwise it will just use the factory settings. Also, the 5
minute installation time quoted in the ads and on the box are not true. You
have to remove the gas tank to install it... make sure you have a fuel line
clamp because they are not reusable and you have to remove it. The dealer took
about 45 minutes and they had done it before. You could probably double that
time for a home installation. The PC3, O2 sensor and labor were a shade over
$500.00 :-( but I think it was worth it. The bike runs like a raped ape!
You will need the Hi-Perf O2 sensor if you want to control the mix
below 3400 rpm otherwise it will just use the factory settings. Also, the 5
minute installation time quoted in the ads and on the box are not true. You
have to remove the gas tank to install it... make sure you have a fuel line
clamp because they are not reusable and you have to remove it. The dealer took
about 45 minutes and they had done it before. You could probably double that
time for a home installation. The PC3, O2 sensor and labor were a shade over
$500.00 :-( but I think it was worth it. The bike runs like a raped ape!)
)
 It looks cool and the butterflies open and close. The thing that I
didn't know before I bought it was that there is about a 1"x6" slot
cut out of the bottom... needed for the bike to idle. If you notice when the
bike is idling, the butterflies are mostly shut. It kinda defeats the purpose
of the ram charge effect that I assumed I would get.
It looks cool and the butterflies open and close. The thing that I
didn't know before I bought it was that there is about a 1"x6" slot
cut out of the bottom... needed for the bike to idle. If you notice when the
bike is idling, the butterflies are mostly shut. It kinda defeats the purpose
of the ram charge effect that I assumed I would get. )
)
)
)
)
)
)
)
)
)
)
)
)
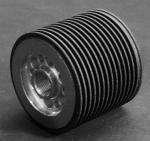 American Sport Bike has a billet aluminum spin on oil cooler that
fits between your existing oil filter and the engine casing... bike runs 25 to
30 degrees cooler.
American Sport Bike has a billet aluminum spin on oil cooler that
fits between your existing oil filter and the engine casing... bike runs 25 to
30 degrees cooler. 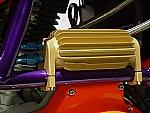
)
)
)
)
 Catch that oil with a
)
)
)
)
)
)
)
)
)
)
)

)
)
 From
From
)
)
)